
(2014-09-14)
DrWimpC App Builder stores menu definitions in text files maintained using its Menu and Menu Item Edit lists. A reference menu
list is stored in the Resources.UK folder. Each menu has a name and a title. The menu item foreground and background colours can also
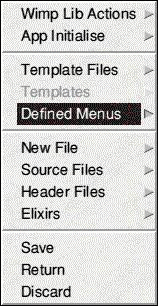
be defined. To view and edit the menulist follow the Project menu 'Defined Menus' item submenu arrow and select 'Menus' to open
the menu list.
When an application starts the DrWimpC library uses the menulist file to create menu structures that can be attached
as submenus to other menus or linked to a window/icon definition and automatically opened when the menu button is pressed
while the mouse pointer is over the window/icon.
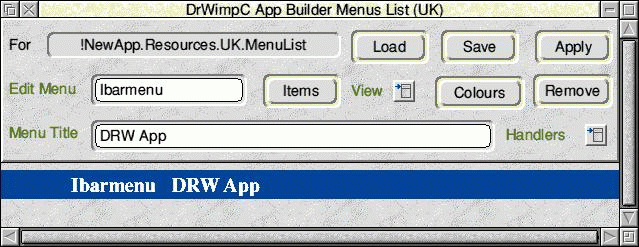
To edit a menu definition select it from the list as shown below for the default
iconbar menu that is created when a new application is created.
Click Apply to modify the menu details and when ready select
save to store all changes to file.
To add a new menu definition ensure no item is selected by clicking on an empty area of the
menu list to unselect any currently selected item, then add the menu name and title and select Apply, and Save to store the
definition in the menu list file.


To delete a menu definition and its items select the menu from the list and click Remove and Save.
You can view changes to the
menu
definition (before or after saving them to file) by selecting the View menu button.
The menu and its submenus will
be displayed, including windows attached as submenus.
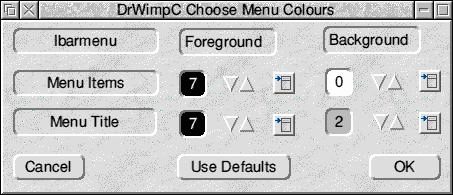
Selecting the Colours button opens the menu colours dialogue.




Use the up and down arrows or the colour box to set the foreground and background colour of the menu's title and of all
the menu's items to one of the 16 wimp colours. The defaults are black/white for menu items and black/grey for the menu
title.. Click on the 'Use Defaults' button to reset the colours to the defaults.
When you have saved a menu definition to file you can add items to it . Select the menu in the menu list and then click on the
Items button to open the menu items list dialogue for the selected menu. The example shows the items for the default iconbar
menu.
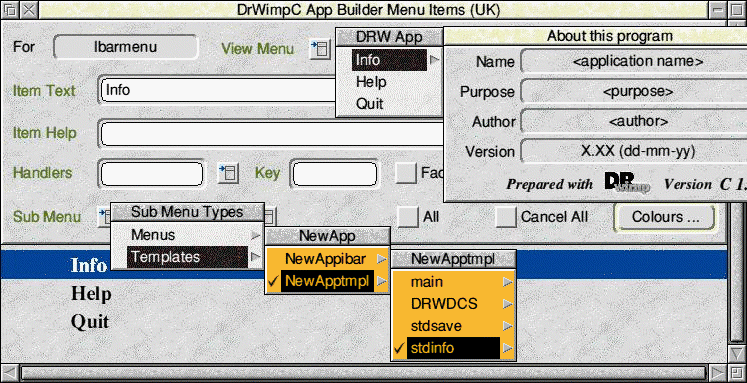
The illustration shows the result of clicking <MENU> over the view item. The menu structure for the currently
selected menu (Ibarmenu) is displayed . In this case the sub menu arrow leads to the standard info box from NewApptmpl/stdinfo.
Also
shown is the sub menu selection menu for the info box with the NewApptmpl templates file and stdinfo template selected.
The Menus
item would lead to the list of defined menus (with Ibarmenu greyed out). Selecting one of the defined menus would result in it being
attached as the sub menu.
You can also select a template using the Click Action menu opened by clicking <MENU>
over the Click Action button. You will get a menu leading to the template files and templates sub menus for you to select the template.
Click the 'Apply' button and then the 'Save' button to update your application with the new selections.

To edit an item select it from the list and make the changes then select click the Apply button. Do this for each item you
want to edit then click the Save button to save the changes to the application. To add an item to the menu click on an empty part
of the item list window so that no item is selected, then add the details of the new item.
To delete an item select it from the
list and click on the remove button and then Save to update the menu items file.
The item help will be displayed automatically
when the !Help application sends a help request message to your application and the mouse pointer is over the menu item. Instead of
plain text help you can specify a stronghelp manual page by entering a stronghelp command which must begin with the strong help command
'StrongHelp ' to distinguish it from plain text. E.g.for the !DrWimpC Functional API English manual the command would be StrongHelp
DrWimpC:Resources.UK.DrWimpCAPI drw_u_help Then, when your application has the input focus in one of its windows, moving the mouse
pointer over an icon or menu item that has a StrongHelp help text command and pressing the <F1> key will open the StrongHelp
help page for the drw_u_help function. Of course you will need to have !StrongHelp installed and been seen by the Filer before
any StrongHelp pages can be loaded.
You can also combine a StrongHelp command with bubble help text by concatenating the command
with the plain text using the ^ character, for example:
StrongHelp DrWimpC:Resources.UK.DrWimpCAPI drw_u_help^Press F1 for more
info
Note that the whole line of help text must still fit into the 236 character limit of a wimp help reply message buffer, so
must not exceed 235 characters.
As an alternative to a StrongHelp page, a text file can be displayed using a second
help text command - TextFile in place of StrongHelp a t the beginning of a help text. It takes a full filename path as a parameter.
For example,
TextFile DrWimpC:disthelp^Press F1 for help
would load a file called disthelp stored in the main !DrWimpC application
directory into a text file editor.
The 'Press F1 for help' text would be still be sent to the interactive help application as usual.
If
your window has a button type of NEVER you can still operate a help button using the F1 key by setting the 'Hot Keys' flag of
the window's template using a template editor. Then, as long as another window having the input focus doesn't claim the F1 key press,
it will be passed on to your window as before.
See also, the 'External Help Buttons' section for details of hwo to add a
help button to any window of a DrWimpC App Builder application that responds to the F1 key or a mouse click - without requiring any
code changes or recompilation of the application.
The Colours button leads to the same colour dialogue as for the Menu List dialogue
described above. Here it allows the foreground and background item colour of individual items to be specified.
As before you
can view the changes you make to the menu by selecting the View Menu button.
The attributes Faded, underlined and Selected correspond
to the menu flags that indicate if an item is selectable or not (greyed out), has a delimiter between the item and the next item and
is initially ticked.
The 'Key' writeable icon is the text of a shortcut key to carry out the action that would be carried
out if the item was selected (e.g. in an editor CTRL +X to cut a selected block of text). The key combination would be entered
into the Key field as ^X. You will also need to define a shortcut value for the key text using the shortcut key dialogue and link
the shortcut key press to the menu and menu item and either a generic hot key window or a specific window that is created from
a template in your application's template file. The shortcuts dialogue is described later when template associations are described.
The
'all' item when selected causes any changes you make to also be applied to subsequent items you add to the menu, and the 'cancel all'
option ends the cancel all effect. This allows easy application of menu attributes to a group of menu items without having to specify
them individually for each each item.
A submenu can either be another menu or a window. DrWimpC App Builder allows you to select another defined menu or a template
from a template file to associate with the selected item as its submenu.
The Click Action button works in a similar way except
that only templates are listed and the selected template leads to a static dialogue being opened when the menu item
is selected.
You can also use defined menus in the same way as manually created menus and attach them as sub menus to your own
menus using the function drw_wimp_attachsubmenu. The defined menu will still operate in the same way in that its sub menu tree will
still be attached to it and any menu handler functions (See Menu and Menu Handler Functions) will still be called automatically.
RISC OS applications achieve language internationalisation by means of their Resources directory which contain a directory for
each territory you want to supply a translation of things like template and menu definitions and messages used by your application,
and whatever else you r application needs. DrWimpC App Builder and the run time DrWimpC library use the standard RESFIND program to
identify the territory directories present and define a system path variable to them so the correct definitions, etc for the territory
are loaded by the application, and/or are edited when using DrWimpC App Builder.
As this is a very varied task, some organisation
in the approach to maintaining each territory is required. For example, the UK territory is used as a default location
for the resources and assumed to contain a full set of them.
So, these should be defined in their entirety first and used as
a base to copy into other territory directories and edited accordingly. DrWimpC App Builder expects you to use this approach and assumes
things like the defined menu files are already present in a territory directory when you edit them using DrWimpC App Builder. Other
approaches will lead to problems.
So far I haven't mentioned the Menu List window's Handler button, nor the Menu Item List window's handlers writeable icon and associated
button.
Both these features are connected with the next topic of Template Functions.
These use icon names to associate C functions
with events that involve the window/icon,menu, received message, etc. The icon names take the form
<appname>:<TemplateFilename>/<Templatename>.<iconname>
For
menus an equivalent name is derived from the application, menu and for items the handler name you enter in the Handlers writeable
icon. This allows generic functions to be called to handle events for the menus and each item.
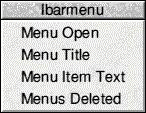
The types of function can be seen
in the handler menu examples. for Ibarmenu and named menu item handler Ibarh. Selecting one of the handler menu items causes
an external edit window to open with a default function definition and edit cursor at the start of the function body. After adding/editing
your code for the menu and menu items save the file. To compile the file select the 'Build' compile option. See also Template Functions
described in the next topic.
