

(2014-09-14)

Another way to start a source file edit of a template's template functions is by using

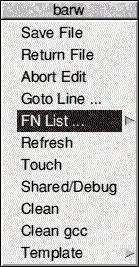
the source file sub menu as for WimpLib Action and user source files. With the mouse pointer over the template click the <Menu>
button to open the sub menu and select the FN List ... item to open the goto function list window. From that you can select the function
or line to go to as before.

Defining and Linking Shortcuts.


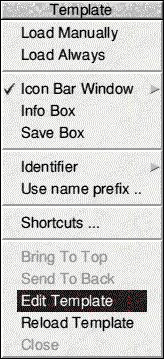
For a template the source file sub menu's Template item is now unshaded. It leads to a submenu, shown right, that provides options
for you to tell DrWimpC App Builder how it should handle windows created from the template.
The Load Manually/Always items control whether DrWimpC App Builder generates code to automatically create a window
from the template at application start, and so generates a window data structure to hold the window handle, etc, or lets your
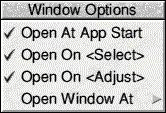
application handle all the loading etc of the window. Setting the Iconbar window item causes DrWimpC App Builder to load (and
open) the window according to the Window Options flags. The button <Select> and <Adjust> actions apply to the application's
icon bar icon.
Specifying the window is an Info Box associates the window with the Icon bar menu Info Box Item as the standard
info box that is opened as a submenu.
Specifying the window as a Save Box causes DrWimpC App Builder to automatically use it
when a quicksave is performed by your application.
Setting the Use name prefix item indicates that DrWimpC App Builder should
prefix all template function names in your application with the application name.
The identifier dialogue that opens as a submenu of the Identifier item lets you specify an integer identifier that you can
test for in your application to identify the type of window being handled (e.g. in initialisation functions). The id name is #defined
by DrWimpC App Builder so you can use that instead of testing for the integer code. Prefix causes the application name to be
appended to the user id name. The user Id value must be greater than 256. Lower numbers are reserved for DrWimpC App Builder.

It may be that on opening the template in DrWimpC App Builder you may find that you have incorrectly named an icon, or forgotten.
to include an icon, or want to add, remove or edit existing ones. It would be useful to do those things without having
to reload DrWimpC App Builder to get it to notice the edits.
That is the idea of the 'Edit Template' and 'Reload Template'
Template menu items.
By selecting the 'Edit Template' menu item you can start a template edit in your preferred template editor.
DrWimpC App Builder employs the OLE protocol to do this.
The template file is the normal 'document' that is handled by template
editors. DrWimpC App Builder copies the template file to a temporary file that it uses for the edit. Once the template editor opens
the template file and displays the list of templates in the file in its its templates window, DrWimpC App Builder sends a mouse click
to the Template Editor for its template list window and icon representing the template to be edited causing the template editor to
open the template ready for editing.
Then, you can make any changes and save the temporary template file back to DrWimpC from
the template editor's save dialogue. DrWimpC App Builder will then copy the temporary file to the real file and reload it so that
its displayed copy of the template is up to date.
Of course, you can edit the template without using the DrWimpC App Builder
OLE edit mechanism. Then you can update DrWimpC App Builder's copy by selecting the 'Reload Template' menu item of the Template menu.
Note that *all* templates for the template file will be reloaded because the template file is the natural edit unit of the template
editor.
You can also start an OLE edit on the template file without opening a specific template by selecting the 'Edit Templates' item
of the template files sub menu. This menu is opened by following the sub menu arrow of the Project menu Template Files item and template
file names sub menu for the template file you want to edit.
There is also a corresponding 'Reload Templates' item to update
DrWimpC App Builder's copy of a template file and its templates after you have used a template editor on them.
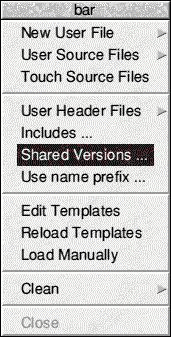
From this menu you can also add additional source and header files of your own to provide the functionality associated with the template
functions for the templates in the template file.
The 'New User File', 'User Source Files' and 'Touch Source Files'
items
when selected do the same for template user supplied files as their corresponding Project Menu items for application
user source files.
This question applies to GCC 4. The ROOL C tools will produce statically linked libraries.
DrWimpC App Builder will instruct
GCC 4 to produce statically linked template function libraries by default. There is no need for them to be shared if you
only use them in a single application.
However, if you want to reuse the template functions and associated templates in
more than one application, or even release them for others to use, (with or without releasing the source code too), then
the GCC 4 shared library facility can be used to achieve this. It allows you to load a single piece of code to control all objects
that the template functions in the library cater for in all the applications using them. The !bar barobject is an example of this.
The !bar2 application in the Examples provided with DrWimpC App Builder illustrates this by having 4 barobjects in its main
window, and a button 'New' that demonstrates the facility to create additional objects in a window from your own code.
In addition
it is possible to have multiple versions of the template function library present. This caters for the case where you may release
a new version of the library that provides new or amended functionality with a function interface that is incompatible with an earlier
version of the library. So both versions can coexist and be correctly linked so that an existing application can use
the older library while a new one can be linked to the new version of the library.
Ro achieve this DrWimpC App Builder makes
use of both the Symlinks file facility provided with GCC 4 and the accompanying LD_LIBRARY_PATH element of the system
variable <appname>$LD$ENV. .
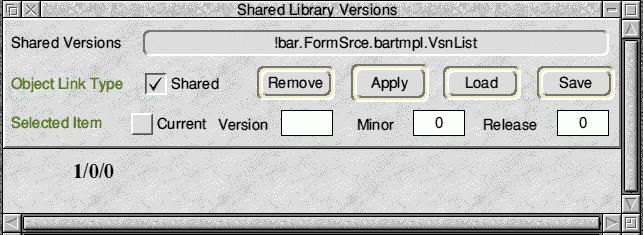
You can specify the versions of a shared template function library by selecting
the 'Shared Versions ...' item of the template files menu. This will open a list of versions that you can add/remove items to/from,
and also specify whether the library should be shared or statically
compiled and linked, and which version is the current version.
When
you specify the library as shared, DrWimpC App Builder will compile, link and then copy the shared library object into a sub
directory - shlibs - of the FormSrce.<templatefilename> directory in your application. There will be a single sub directory
in shlibs for each version you use to create a library. The library for that version is copied into this sub directory.
Also,
DrWimpC App Builder creates two symlink files for the library named according to the shared library naming convention rules
supplied with GCC 4. The symlink files point to the real library file's location. One symlink file is used by GCC 4 at compile time,
the other by the ELF loader at application loading time to identify and load the correct version of the library your application has
been linked with. The symlink files for each version are stored in the FormSrce.<templateFilename> directory of your application.
If you create statically linked template function libraries, DrWimpC App Builder also stores these in the FormSrce.<templatefilename> directory.
In this way the GCC 4 compiler can detect the presence of a shared version of the library at compile/link time and select it by default.
DrWimpC App Builder allows both to exist in the directory and lets you force the use of statically linked libraries if you want to.
I would recommend developing the libraries with static linking, and once at beta quality or better, switch to the shared version.
The application you use to develop the library provides a test environment for the library (.e.g. as !bar does for the barobject).
DrWimpC App Builder uses GCC 4 and adheres to the Shared Library and symlink file naming convention described in the GCC 4 documentation
section 'RISC OS shared library documentation for developers'.
To use the version numbering system and library storage system
effectively you should understand the naming convention used by GCC 4 for RISC OS shared libraries.
The paragraph on that describes
the naming system is included here
Shared library naming
---------------------
In linux there is a scheme which most libraries adhere to when it comes to
naming (although it is not essential). This scheme is also used under RISC OS in
an effort to keep the same flexibility and to allow future support for multiple
versions of the same library. In order to implement the Linux naming convention
a simple symbolic linking system is employed in a similar manner to Linux. This
allows the same file to be referenced by more than one name without duplicating
it and is achieved by using a special link file which is given the filetype &1C8
(Symlink).
In this
scheme, every shared library has three references, the shared library
itself, the runtime link and the compiler link:
itself, the runtime link and the compiler link:
The shared
library: lib<name>/so/X/Y/Z
The runtime link: lib<name>/so/X
(a symlink to lib<name>/so/X/Y/Z)
(a symlink to lib<name>/so/X/Y/Z)
The compiler link: lib<name>/so
(a symlink to lib<name>/so/X/Y/Z)
(a symlink to lib<name>/so/X/Y/Z)
The
dynamic loader uses the soname, given to a library at build time by
the static linker, to find the library - this is the runtime link.
When the static linker (ld) is given a library on its command line,
e.g. -UnixLib, it uses the compiler link to find the library.
the static linker, to find the library - this is the runtime link.
When the static linker (ld) is given a library on its command line,
e.g. -UnixLib, it uses the compiler link to find the library.
The
Symlinks are not an OS wide solution, but merely extra functionality
added to UnixLib and the static/dynamic loaders. A utility to create these
Symlinks is supplied.
added to UnixLib and the static/dynamic loaders. A utility to create these
Symlinks is supplied.
Note that it is not mandatory to use the naming convention described above,
libraries can simply be called lib<name>/so and placed in !SharedLibs.lib,
however, this is not very flexible as it doesn't allow multiple versions
of the same library.
libraries can simply be called lib<name>/so and placed in !SharedLibs.lib,
however, this is not very flexible as it doesn't allow multiple versions
of the same library.